Showing posts with label paper scraps. Show all posts

Friday, February 16, 2024

DIY Mini Envelope

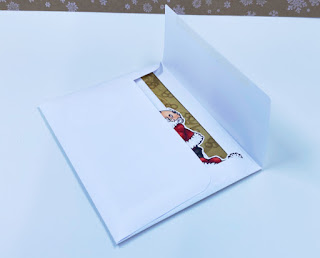
 I've been having fun using up paper scraps to make mini-envelopes as embellishments for my cards. I figured out how to make the medium sized one with the Envelope Punch Board. But I also wanted some mini ones so I figured how to do that on the Scor Pal score board, with out the Scor Envi guide.


Tah-dah! This size of DIY envelope is a bit smaller than the currently popular Envelope of Wonder die by Spellbinders. I did make one the same size as the Envelope of Wonder, but I find it a little big. I made this as my mother-in-law's birthday card. I used a few Penny Black stamps and went for a watercolour look. I watercoloured the bird and then the flowers are a solid stamp, designed to look like you watercoloured them. The newsprint paper is among the last of the scraps I have for it. I love that paper!

I think I did okay with the watercolour. It's not my style but I've tried a few more since then. I do love that you only need 1 colour to get the variations by diluting with water. But, you don't get the same degree of control that you do with alcohol markers. It was fun to play around with something different though!

Do you like making mini-envelopes? What do you use yours for?

Saturday, December 2, 2023

Scrap Paper Christmas Cards

If you're a paper crafter, you have scraps! I've been working away at my Christmas paper stash for a few years. I finally finished one pad off and another is about halfway there. I'm not going to buy pads again unless I love a lot of it or I'm making a mini album and I will use most of it for that singular project. I'm finally "low" on Christmas paper, but I picked up more from others who were offloading them, so it's still on the no-buy list unless I'm making an album.

So, this year, I've been saving up these scrappy card ideas and I made some Christmas and winter cards! I think they turned out great!


I started with the envelopes. Spellbinders has an "Envelope of Wonder" die set that is popular right now. But I knew I could make mini-envelopes on my own with my score board. I also knew I had tonnes of little shapes and stamps that I could stuff the envelope with. So, this is my take on it!


The first one is stuffed all with die cuts and a branch punch. For the second one, I cut out the snowman and ornaments from a paper pad. The trees, greenery, bird, and garlands are other die cuts I have. I used an embossing folder in the background for interest. The greeting is a hot foil stamp. I hot foiled it on the left and letterpressed it with pigment ink on the right. I don't have the matching die, so I cut it out by hand.

I had so much fun making envelopes in different sizes. The one above and the tiny mini envelopes were my favourites. The larger envelope uses a 4.5 inch square and the smaller one uses a 2.5 inch square. These use a decent amount of scraps! For the mini's, I coloured up a whole stamp set with my Copic markers and stuffed them inside the envelopes.

The next thing I tried were strip clusters. I had some left over strips and I've seen lots of YouTube videos for making your own cluster embellishments. Clusters are not my strong suit. I lean to clean and simple. I started with just layering up the strips. I made some paper stockings and these were the left overs. When I sat down to make cards, I pulled out the layered strips (pictured on the right). Then I just tried to match them with a focal image and a sentiment.

Although I tried to add some interest with the softly ink blended circle frame, this card still felt a bit too plain for me. It's fine for a masculine card, but it needed something more. So, for the next one, I embossed the background again and it made a big difference!

Then I did one more step with the embossing folders and used white pigment ink on top.

The last of the scrappy Christmas cards I made use the tried and true scrap strip background technique. You just keep layering strips next to each other to cover some amount of the background. Then I used an idea from Jill Foster (from the Penny Black YouTube channel). Penny Black has some sentiment dies that cut out only the top part of the word. So, I did some partial die cutting to mimic the effect. Their dies do a swooshy line. I could only achieve a straight line but I think it looks fine.

The "joyful" die by Hero Arts has a shadow. The shadow is what I partially die cut and then I cut the word from red foil cardstock. For the next batch, I don't have a shadow die. So, I just manually cut around the words. It's easier with words like these (from C.C. Rubber Stamps) that are not too frilly.

I finished all the cards off with some enamel dots - except the deer. It has flat stickers (I think they are vinyl). The "candy" style dots are from Queen and Co. and were actually marketed as beach balls. But I think they look like candies. The glitter dots are from my Your Next Stamp stash. (Your Next Stamp is closed now, sadly.)

I hope these scrap paper Christmas cards inspire you to work your stash this holiday season! I really like the bear on the strip cluster and the partial cut words on the strip backgrounds. What's your favourite?


Sunday, November 22, 2020

Got Large Image Stamps? ...

 ... Make bridge cards!! Continuing my experiments with bridge cards, I figured they would be a fantastic way to employ the large image stamps I've struggled to use in the past. You know, the ones that take up an entire A2 card front. Of course, I could make 5 x 7 inch cards, but it's a pain to make envelopes for them because an 8.5 x 11 inch sheet of paper is a smidge too small for my large envelope die.

Enter, the bridge card.

I have some stamps from High Hopes Rubber Stamps. I've had them a long time. I bought them because I believed larger images would be much easier to colour. I failed to account for the fact that large images would be harder to incorporate on a regular sized card.

Well, they are perfect for bridge cards! The image spans the gap in the front to create a free-standing card with dimension!

I really like how this one turned out. I coloured these cards with my Copic Marker alcohol markers. These cards are also a fantastic way to use up scraps! The paper in the centre is a scrap as well as the two, half-inch strips along the sides! Plus, it still folds flat to put in the envelope.

I really enjoyed colouring this Santa with the kittens.

The only thing about the vertical bridge cards is that it leaves only a tall skinny space to write on the back. So, I figured out the dimensions for a landscape version. I coloured another image from High Hopes Rubber Stamps for this card.

The sentiment on this card is from a stamp set by Dreamerland Crafts. Both High Hopes and Dreamerland are small Canadian businesses. I know huge sentiments are all-the-rage right now, but if you are using a huge image stamp, a small sentiment is just what you need - and we all probably have heaps and heaps of those!

Boy, it took me a long time to colour this one just-so, that's for sure! I used a stitched hill to bridge this card, even though Santa and the reindeer would have been wide enough on their own. I had thought about doing a roof top with layered scallops. I might try that next time. For this Santa, I added some sparkle on his coat trimmings and hat with Nuvo glitter drops. (Stickles would work just as well.)

So, bust out your BIG stamps and dig into your scraps. Have a ball creating bridge cards for all occasions!

Wednesday, December 11, 2019

Floating Element Aperture Card - Winter Birthday

I needed to make my mother-in-law a birthday card. I saw a tutorial by Mixed Up Craft. In her spinner version tutorial (that I linked), she links back to her floating element tutorial. I don't like square cards, so I made the 5 x 7 version but used the popped up sentiment bit from the spinner version.


It's basically a twist on a regular shadow box card. Instead of putting the aperture on a flat side of the box, you put it on the corner. That allows you to use acetate to "pop out" of the aperture and to have the sentiment to the same with a very clever "bridge" piece behind it.
You end up with this clever diamond shaped card that folds perfectly flat for mailing. Love it! I've already figured out the dimensions for an A2 version too.
I used my Nuvo Embellishment mousse on some cardstock and then cut the snowflakes out. I wanted to add just a touch of shine. The gifts are made from paper scraps. I love using my scraps to make gift boxes for cards. It works for birthdays and Christmas!


I think I will be making more of these! I think I will go ahead and figure out the dimensions for a landscape version of both sizes. The A7 will have to be constructed out of a front and back piece but the A2 can fit on a single piece of paper. To be honest, now that I think about it, I think a two piece construction might be simpler anyway, so it's easier to figure out what outside and inside areas need paper!

So many possibilities with this design!  I hope you are inspired too!

Sunday, November 17, 2019

Stash Busting - using scrap paper strips and a card sketch

The papers in the rubber stamping and scrapbooking scene are so pretty. Sometimes, it's hard to part with even the scraps! In the beginning, I had so few supplies, I always salvaged all the scraps I could. Today is a different story, but I still have that mindset of needing to hoard my scraps.

I find card sketches are a great way to use up scraps! On these cards, I used Little Tangles Sketch #72 by Neat and Tangled.


I made this one for my husband's birthday. He was born on Halloween, so the monster theme works. This monster stamp set is by C.C. Designs. I added a balloon die cut from a Stampin' Up! punch. I used my fancy gold mirror card for the oval on this one.

I love that stuff! That's the kind of thing I would hoard, so I've been making a conscious effort to use what I love. What good does it do if it just sits in my stash? (Other than make me happy when I open my drawers and see it - but the point to cardmaking is to make other people happy too!)

I made two other cards with this sketch too.
I used a Spellbinder's oval die on this holiday card. (I think I know who will get this one!) I have tonnes of Christmas paper scraps. I think I could make my entire holiday card list out of scraps alone! Again, I used some precious specialty cardstock, this time in a satin finish rose gold. I also used a very lovely, thick gold metallic cardstock as the mat. I like that stuff so much, I cut the centre out of it with a stitched rectangle to keep. I cut a second stitched rectangle out of white cardstock to fill the void so that my striped piece wouldn't sink.

The stamp is a retired image by Your Next Stamp. (Luckily, the still have the same bunny available, just holding a heart instead of a gift.)

On the last card, I used non-shedding glitter paper. (I somehow acquired so much glitter paper, it doesn't all fit in my drawer, which means I'm over the limit!)
This bear stamp is a retired one from Kraftin' Kimmie stamps. I coloured it with my Copic markers on Bazzill Kraft cardstock. (In fact, all three cards were coloured with my Copic markers). If you use a base colour that is close to your lightest Copic shade, then I find there's less work in getting a good blend because the base colour will hide those imperfections. It's a good tip when colouring die-cuts to add depth. (OR, you could just make all your die cuts white all the time to save on cardstock and colour them all yourself.) I think using a coloured base adds something different - makes it a smidgeon more visually interesting.


And while I'm proud of using up some scraps, these three cards hardly made a dent! I've been making cards with sketches for quite a stretch now, trying very consciously to use up scraps. I'm making progress (but it's not nearly as fast as I accumulate new stuff. Shhh! Don't tell!)

Thursday, August 8, 2019

Dragon's Birthday Gift

Here's another challenge card. This one is for the Kraftin' Kimmie Stamps Challenge #492: Green. I will be going to my first Kraftin' Kimmie stamping/scrapbooking retreat this year. I have a few Kraftin' Kimmie sets and one is these Darling Dragons. Dragons + Green works perfectly for this challenge entry!

I used Paper Craft Crew Card Sketch # 325 for this card. I added a little gift from the dragon using a stamp in a Hello Bluebird set of stamps that I have.
(Click photo for larger view.)

I used a scrap strip of patterned paper. The sketch called for a bigger piece at the bottom but my strip was narrower. I chose to place it higher and border it with two 1/8th strips of metallic black cardstock. I used my 1/8th strip cutting die from Accucut Craft to make the strips perfect.

I coloured this dragon with Copic markers and also added the iridescent medium to its spine and tummy. I used a Sakura sparkly pink gel pen on the gift's ribbon.
(Click photo for larger view.)

I masked the gift first and then stamped the dragon after so that the gift would be in front. I heat-embossed the sentiment in white on the dark navy paper. The paper scrap has glitter in it as well, but I didn't get it in the photo. A tiny scrap of silver glitter paper finished the card off.

Saturday, July 13, 2019

Christmas in July Shaker Cards

I try to sneak at least one Christmas card into my workshops each time. Those are by far the biggest batch of handmade cards I send in a year. So, for our July shaker card class, I made sure one was Christmas.

Another could be Christmas but it could work for a winter birthday too. The summery card is a "just because" kind of card.

I was inspired to make shaped shaker kits like the ones from Queen & Co. If you've got a Xyron sticker maker and some nesting dies, you're good go. Else, you can buy the whole kit and kaboodle from Queen & Co.

I really liked Queen & Co.'s All Bundled Up kit. I love the chubby little penguin in it. But it also has this cute winter hat, or tuque we would call it here in Canada. I like watching CardsandCoffeeTime's youtube videos. She's on the Queen & Co. design team and I really liked her version of the hat card (<--- click="" her="" p="" post="" see="" to="">
I don't have the kit or dies, but I have a half circle by Frantic stamper. So I used that and made my own shaker hat!
This shaker is filled with seed beads from Dollarama or Dollar Tree.

For card number two, I've been a fan of collage front cards for a long time, but never wanted to invest in the cost of the dies. I finally bought a couple when I found a good sale on Accucut Craft's website. I got the dies for only a little more than the wafer thin, chemically etched dies, but these are steel rule. So, I can cut chipboard and thin wood and other materials if I wanted to collage a home decor piece or something.

These are colour blocking dies, but they are also called collage dies or cover panels. I bought one in A2 (4.25 x 5.5 inches) and one in A6 (4.75 x 6.25 inches) as I make my cards those two sizes almost exclusively. Here's the A6:
I *love* how this card turned out. I used glitter cardstock from Dollarama or Dollar tree. It's thin, but pretty and doesn't shed. I used a handful of paper scraps for the backdrops and then a mix of beads and sequins inside. This type of collage card is *excellent* to use up small scraps! I coloured the bunny with my Copic markers.

Here's the A2 card. I just had to use these penguins from Hello Bluebird. (I love the storybook style of drawings for Hello Bluebird's stamps!) This one is not a shaker. I wanted to see how well it looked just flat instead of a shaker. Isn't it cute? Mommy and Daddy penguin are by the mistletoe while the kids have a snowball fight.

Back to the shaker cards! Our last shaker card for the workshop was a springtime Yeti (a.k.a. abominable snowman, a.k.a. sasquatch). I could have coloured him brown like a sasquatch but I didn't.

He is also a Hello Bluebird stamp, along with the sentiment. I wanted to show my creative crew how, if you use vellum instead of acetate for the shaker window, you can tone down what's behind it. Here, we stamped on the vellum, but you could stamp on a strip of paper and lay it across the vellum. (If you stamp on vellum, you must use Stazon or other archival/permanent ink because vellum is non-porous.) Because the vellum tones down the shaker filler, we used all sequins in this shaker. There's a mix of 5 warm coloured sequins in there.

We used my homemade cloud stencil and some Dollarama make-up brushes to create the sky. The round balloons are from a Stampin' Up! punch that I have and the heart shaped one is from a Marianne Design die set. Again, I used Copic markers to colour the Yeti and the bluebird.

The crew enjoyed this workshop. Having the shakers as a whole kit really made them go faster for the participants. Hooray for Queen & Co. for doing the heavy lifting and offering simplicity to their shoppers which inspired me to do the same for my creative crew.

Wednesday, April 24, 2019

DIY Notepads from Paper Scraps

Got scraps? Make memo pads! I made almost 30 DIY notepads for administrative professional's day. I used plain copy paper cut to size, tissue boxes for covers, and paper scraps for embellishments.

I have a video walkthrough of all the ones I made (minus 2 smaller ones that in had to pop in the mail before filming).

I got the copy paper free and, for my favourite 2 sizes, 10-12 sheets makes 3 pads of 20-24 pages. The pads themselves are very easy to make with loads of video tutorials readily available. Since I am klutzy with a glue gun, I used the slower, Elmer's glue method. I have no idea if these pads will hold up to having sheets torn out or will split into pieces part way through. Only one way to find out - USE them!

What I like about them is that, for cardmakers, when your pad is all done, you can trim the front covers to a smaller rectangle and use it as an embellishment on a card!

I tried to keep all the sentiments positive and happy thoughts.

I even did a little DIY on some embellishments. I made these faux enamel dots with cardstock, gold nail polish, glossy accents (glue) and good ol' scissors.
(Click picture for larger view.)

Want to see them all? Click the picture below to go to my YouTube channel to see them!


Sunday, April 21, 2019

Happy Easter!

I went to the Lindt factory outlet in my part of the city. I love that they carry some Ghiradelli chocolates. I bought some squares and some bars for co-workers as Easter treats. Well, I had to dress them up!

I recently purchased a Marianne Design bunny die set. I don't normally go for bunnies but there's A LOT of versatility in this set.

I put them in the mug because I think that is sweetest. They have the little arched eyes and I knew I could use those on my fox die from Marianne Design too that I use for die cuts that look like our husky. (I just noticed now that I did one set of eyes arched up and one arched down! Oh well, both look okay to me!)

The wrapping paper is just from a kraft roll from Michaels. I stamped all over it with a Stampin' Up! flower set. (It wasn't hard but it took a while to cover the whole paper.) I used a Your Next Stamp tag topper die. It cuts the shape at the top but has no bottom so you can make the tag as long as you want.

Behind the bunnies, I just used a wash of colour. The pink bunny is from a Tombow watercolour marker.
I even made the "enamel dot" heart! I used some acrylic paint and then blobbed some Glossy Accents dimensional glue over it in a heart shape (two tear drops joined together). I let it dry and then cut it out by hand. I think it turned out very well! I love that it's semi-flat - good for mailing. (And it's sparkly because the paint was sparkly.)

I did the same techniques on the blue one.
You can see the dimension of the homemade enamel dots better in the second picture. For this one, I used dollar store nail polish on black cardstock underneath the dimensional glue.

I made a little basket for the squares out of my french fry box die. You basically cut two backs of the die and stick them together and then make little handles. (Sorry, didn't get a picture of that one. It was getting pretty late at night!)

I think they turned out cute and I'm very proud of my dots. They are not perfect circles like manufactured dots, but when they are scattered on a card and given to non-crafters - I'm sure no one will examine them closely enough to notice.

P.S. this project used only scraps! Love it!