Sunday, December 30, 2018

Milestone Mini Album Gift by Lara

Today, I've posted a scrapbook mini album video walk-through of what my sister made for her friend who was celebrating a couple of milestones at the same time. My sister is one crafty kitty! There's lots of room for photos in this 5 page album.


Her friend likes black and red and also purple. So the album base is black and there are some spreads in red and some in purple. Her friend also likes sparkle, so there's plenty of glitter papers in this album too.


My sister was in charge of the design, papers, and embellishments. I helped with the measurements and was a sounding board for the design. (Plus I have a pile of tools so we used my stuff in the making of the album.) The cover was done with a bit of mixed media, so it is made out of black Kraft Tex for durability.

The album base is a pre-made album by Heartfelt Creations. It is 9 x 7 inches on the outside, so the pages are only 8.5 by 6.5 inches. It's too bad they didn't make it a touch bigger because you can't fit a 5 x 7 in landscape. So, we designed it with 4 x 6 inch photos in mind. (The recipient is not a paper crafter.)


The album holds a total of 44 photos in 4 x 6 size. Of those, a maximum of 32 can be horizontal (landscape orientation) and a maximum of 42 can be vertical (portrait orientation). You can see the video on my FairyCardmaker YouTube channel.

Wednesday, December 26, 2018

2018 Handmade Christmas Cards Received

Hello, creative world! We got a nice crop of Christmas cards this year. All of them are always appreciated - both physical and electronic versions. Some of the ones we got this year were lovely handmade holiday cards. I thought I would show case them here.

This first one is from my sister-in-law's family. She used some of the die cuts from our holiday card kick-off workshop. The circle has a cross-stitched edge and is cut from silver glitter cardstock.


This one we got from my husband's cousin, Chad and Nicole and family. Look how cute the punch art is! The chimney is embossed with a brick texture and the sentiment is a lovely red glitter. I believe Santa's sack is made from the owl builder punch by Stampin' Up! I love when people find creative uses for punches outside of their original design.


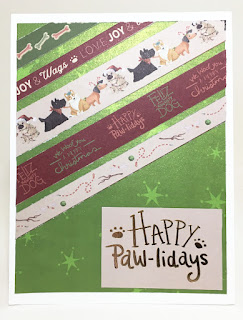
This next one is from our friends, Claire and Jim. She gave us a dog-themed one as we do have a single furbaby doggy. She used some sparkly metallic green background paper and put dog-themed strips of paper on a diagonal with a gold foiled sentiment. On the inside, she put our dog's name on the dog house (even though some of it is behind the cute doggy).

The last card is from my sister's family. She also gave us a dog-themed card. She used a gold foil background paper and a layout we used in our holiday card kick off workshop. She water-coloured the cute puppy stamp on the front.


I am certain that much care and effort went in to these cards. Did you get anything handmade for Christmas?

Sunday, December 9, 2018

Have you started your Holiday Cards?

Some people start their holiday preparations right on December 1. Some people start right after Thanks-giving (which is earlier in Canada then in the U.S.). Me? I usually start feeling the pinch mid-December and then I start rushing through it all.

I do have a small handful of cards in my stash, though, because I sprinkle a few holiday cards into my workshops throughout the year.

Our last workshop of 2018 was in November. It was our holiday card kickoff! Each participant was given a bag of ephemera (made by me from die cuts) and some holiday card samples that I posted earlier. The participants dug in to their own stash of holiday papers and embellishments to bring their own ideas to life with my initial inspiration cards, the die cuts, and my stash of stamps. (I provided measurements for my cards in case they wanted to make the exact sample.)

Here's what they came up with! I hope you will find some inspiration in these layouts! (Click on ANY of these images to see them LARGER.)


(Another for Lara, separately. She had not glued it down yet.)

Hope your holiday preparations are joyful and as stress-free as possible!

Wednesday, November 14, 2018

2018 Holiday Cards Workshop

It's time to buckle down on making Holiday and Christmas cards! I've got 3 layout designs ready for my last workshop of 2018. I'm hoping to make a couple more, but it will depend how much time I have. 2018 is going out with a bang with a record number of family and friends signed up! I think there will be lots of chatter, laughter, and creativity!

I started out using a card sketch: My Favorite Things Wednesday Sketch Challenge #360

This is how mine turned out:

This one uses one panel of patterned paper. An all-over pattern would be easier to use than this snowman one, but I wanted to use up some of my snowman paper.

The next one uses only scraps of patterned paper. This one is great to use up paper that comes in a pad, as I did here. I used 12x12 paper and cut it down, but even small 6x6 pads or 4x6 stacks would work for this card.

There's a lot of glitter on this card because there was some in every patterned paper I chose. So, I made the tree out of glitter using a die cut and then used gold metallic and red mirror card to decorate it. Atop the tree is a shiny, gold, sequin star.

The last layout I did is the simplest. For that reason alone, I love it. It's an easy way to use up holiday paper! I think I will make more of this one.

I hope my workshop crew likes the layouts and become inspired to create!

Sunday, October 14, 2018

DIY Pivot Wheel (Reveal Wheel) Cards

I designed two DIY pivot wheel Christmas cards for my creative crew in our latest class. They very much liked these interactive cards. They are a bit fussy to make, but worth it in the end! (If you want the no-fuss version and you have a die cutting machine, you can buy the Reveal Wheel set from Lawn Fawn.)

The first one is a little house on a hill. This is a colour changing style pivot wheel. The mix of colours behind the snowflakes changes as you turn the wheel. We used the ink smooshing technique to colour our wheels using my Nuvo Embellishment Mousses.

Because of the smooshing technique, everyone's snowflakes turned out a little different! I coloured my house with my Copic markers, but my creative crew used a variety of mediums and coloured however they wanted. So, all the cards are just a little different! Here's how the class ones turned out, with my sample in for reference.

The second card was a real hit! We made Santa Claus fly across the snowy night sky!
First, all you see is a snowy sky. This snow was made with my homemade stencil that we sponged white pigment ink through. The stencil is just a piece of acetate with holes punched in it in two sizes (using my We R Memory Keepers Cropadile Big Bite).

As you turn the wheel, Santa appears!


On mine, Santa pops out the thumb notch a wee bit, where you turn the wheel. All I had to do to fix it was place a tree over that spot. Works like a charm! I think everyone quite enjoyed this holiday card kick-off class. I think the next class will need to be a down to business, regular holiday card making class so we'll have a good start to the stash by the end of the year of classes. We'll see.

Have you tried a pivot wheel card before? What's your favourite kind of reveal?

Monday, September 3, 2018

Wedding Card using a Card Sketch

This past July, a family friend got married. Since I was all over using my scraps and card sketches, I chose one to make a simple wedding card from.

This is Reverse Confetti sketch #20 with some measurements added by Kristie Marcotte:

I used it to make this:
I used papers I got from a 6x6 pad in the goody bag from ScrapFest Kitchener (Ontario, Canada). I also used flowers I had stamped for another project. I put a thin coat of Moonstone Nuvo Glimmer paste on them to make them all sparkly.
Since the background paper was a little busy, I black embossed the sentiment on a vellum strip to soften the pattern behind the word.

To be honest, this colour scheme gives me a bit of an 80`s vibe! 80`s things are coming back - especially in fashion right now. Not to worry - the Bride and Groom are both old enough to remember the 80`s!

I put a self-composed poem inside, printed on my computer. I hope they liked it! It`s a simple one, but still pretty, if I say so myself.

Monday, August 6, 2018

2 Patterned Paper Card Set Workshop (+ video)

4 ladies had a good time getting inspired and using up some paper stash! I posted my version of the 6 handmade cards I made with sketches in an earlier post. In this post, I'm showing you the cards that my creative crew made. They aren't completely finished. Some people were going to finish them up at home and maybe add something more from their stash.

I've linked my video walk-through of the set of cards I made with the original sketches to this post.

Here's Debbie's cards:

The bottom right card was embossed with falling stars and then glittered, but it didn't come out well in the photo. Debbie was able to use a lot of embellishments that were sitting in her stash to finish up these cards. I think it was quite productive!

These are Claire's cards:

Claire chose very bright and bold cards. Half are unfinished in this photo. Claire has a built a healthy stash at home that she can dig into to complete these cards.

Here are Bev's cards:

Bev was a completely new comer to the card making class. She was a little bit worried at the start but she was very proud of her results (with reason!). She was able to use a combination of my sister's stash and mine. Win win for everybody! (The card in the lower left is actually a very dark navy in the back with an embossed chevron pattern. It just didn't show up well in the photo.) Bev knows exactly who these cards are going to!

These are Lara's cards:

She had a bunch of different paper scraps she wanted to use up. She used the sketches but didn't use the 6 x 6 cutting guide. Here's a close up of the bear. She cut it out from an embossing folder and paper pieced his tummy:

Her last one wasn't all done yet either. She sent me a picture once she finished it at home:

We love that little monster!

You can refer to my original blog post to see the original versions of the sketch or, you can watch the video of the 2PP Card Set on my YouTube Channel  where I walk you through them, including some extras that I made, and show you the cutting guide I came up with. (You can pause on it to see.)

Wednesday, July 25, 2018

Alcohol Ink Galaxy with Nuvo Embellishment Mousse

Here's the last video in my series of experiments with Nuvo Embellishment Mousse to create galaxy backgrounds. This is my favourite! I was thinking about how much I liked the splotchy-ness of the ink-smooshed galaxies I've seen others make with watercolours. Plus, the black ash Nuvo Mousse is actually a grey. I really wanted try a galaxy with a true black top coat.

However, when you use a water-based ink or paint beneath and a black water-based ink or paint above, it can re-activate the bottom layer and you get mud. Nuvo Mousse works on porous surfaces, but dries permanent. However, it makes the surface non-porous, so you can't put water-based inks or paints on top. There's the aha moment! Alcohol inks will work on non-porous surfaces. So, I decided to put black alcohol ink on top!

This is how it turned out. It looks so neat! The alcohol ink leaves a shiny finish, especially where it is thicker. It looks like the paper is still wet but it's not. In person, it looks almost like a photograph because of the glossy finish.

I haven't made any cards with this piece yet because I don't want to cut it up! I did buy a great rocket die in a set so that I could make things with my experimental galaxies. Perhaps, this piece will find it's way to the front of a card sometime.

Click through to my video on YouTube to see my process for making this background.

(I did try one other technique that I did not film: spritzing black ash mousse through a mini-mister. this created a soft but even cover of the grey mousse on the top layer. I prefer to see splotches of colour coming through more vibrantly in my galaxies.)

Thursday, July 12, 2018

2 Pattern Card Set with 6x6 paper

I've been watching videos by Kristi Marcotte on her 6x6 paper pad card making tutorials. I have never bought a 6x6 paper pad, but I've had some given to me. I have lots of 12x12 paper though. I have many sheets that I've cut into but still have enough left to cut down to 6x6.

So, I decided to do a mash up between what Kristi does and the One Sheet Wonder concept. Kristi uses card sketches and uses multiple patterns from the pad, which naturally fit well together. So, I chose some card sketches that Kristi has used, inspired by her makes, and I cut a pair of coordinating 12x12 scrap patterned papers to 6x6.

Then, I figured out the most efficient way to cut the paper to get the sketches I wanted out of them. (That's the One Sheet Wonder part.)

Here's what I ended up with:
There are 2 sketches here. The first two cards are the same sketch, one with each patterned paper. You could pair the patterned papers, rather than make the rest out of cardstock if you wanted to use up more paper. But I was trying to stick to my "efficient cut" method, so I didn't have enough paper to pair on that card. I still like how it looks with just cardstock to accompany the patterns.

The middle card in this bunch is a sketch. The other two are just what I did with the left-over skinny strips.

I really like how these turned out. Not only will I do this set again with different papers, I'm going to pick some more sketches and do another version!

What a great way to build a card stash quickly! I have video walkthrough of these cards that shows which sketches I used. (It will take me some time to get it posted though.)

Saturday, June 23, 2018

Out of This World Galaxy Birthday Card

I've been after a die-cut rocket for quite some time now, to go with my galaxy backgrounds. When I was at Scrapfest Kitchener in April, I found a set! The sample card was way more involved than my card, but I'm happy with how mine turned out.

My youngest nephew turned 8 in May.  I used one of my galaxy backgrounds to make him this card:

The sentiment in the die cut set is quite large, so I had to make a bigger card. All the more galaxy to showcase!

I used silver paper on the rocket's fins and tip and vellum for the window. The rocket is "Hulk" green because that's one of my nephew's favourite Marvel characters. The outer panel is popped up on foam tape to make the circle appear recessed. I carefully made sure to place 8 Stampin' Up! enamel dot stars in my galaxy to represent my nephew's 8 years.

Of course I wrote a little birthday poem inside. He's not so into the cards as he is the gifts, which is typical of a little boy his age.

I love these galaxies! I find they have so much visual interest!

Thursday, May 31, 2018

Bride and Groom from Dreamerland Crafts

I had a couple co-workers get married this May. I wanted to make a handmade card. I wasn't sure what I was going to do and then I saw this Kiss the Bride stamp from Dreamerland Crafts. I really wanted this one because the groom really looks like the actual groom (to me! It's the hair! And he is quite a bit taller than the bride too.) But it sold out before I could get it! Ack!

So, I had to get the next best thing, which was this Welcoming the New Couple version.
I used far more alcohol markers to colour this than I thought I would. I used 3 greys in the bride's dress and the groom's shirt, and 3 different ones in the groom's pants. I used 3 more different ones for the groom's shoes. I used 3 browns in the groom's hair and 4 in the bride's because her hair is a little darker than his. Their wedding colour was a steel blue or a grey blue - a muted colour. I tried to match that with the flowers and the bow-tie - three more markers there. There are 3 colours in the skin and one for the pink cheeks and mouth. I used the picture on the front of the stamp packaging as a guide for where to place the shading.
(Click photo for larger image.)
I made this card shape myself for my Brother Scan'N'Cut die cut machine. I actually made that file for a wedding a few years back. I think it adds a touch of fancy to the card. I added the year to the front to personalize it a little bit (besides trying to make the couple look like the bride and groom).

The bride found it hard to find cake toppers that looked like them. They were either not very nice looking toppers or just not the right colours. I tried to make up for that. I hope she thought I did a good enough job!

Sunday, May 27, 2018

Layered Stamps: Altenew Painted Rose

Layered stamps to make photo-realistic images or faux water-colour-esque images is very popular right now. I received a stamp set at Scrapfest Kitchener (2018). So, I tried it out. It's Altenew's Painted Rose stamp set. It includes a single, very large, rose. Each element has 3 stamps to layer in 3 colours.

The first card I made was a birthday card. I used pinks for this one.

I have a MISTI stamping tool to help me layer it up just right. It actually took quite a long time to stamp all of these. I stamped the flower first, masked it, then stamped the leaves. Then I die cut through it and popped up the cut-out part on foam.

Then I tried a yellow combination. This one I made as my handmade mother's day card for this year. The lightest layer is actually Antique Linen distress ink, which is a pale brown with a yellow tone.
I made a subtle background with a script font background stamp. This time, I stamped the flower and cut it out by hand. Then I placed it so I could see where to stamp my leaves. Then I stamped my leaves and just put the cut out flower on top. I also stamped one less leaf set, partly because this card base was smaller than the first card I did, and partly because it takes so much time to do all that stamp layering!
I decided to try some wink of Stella glitter pen on the darkest colour here. I really like how that looked (but it's hard to photograph. You can click the photo for a larger view.)

Do you like stamp layering? You need to have a lot of ink pad colours, to me. (Or watercolour markers that you can colour on to the stamp, but that doesn't seem work as well on clear stamps as it does on rubber stamps, I find.) Do you have any stamp layering tips or tricks to share? Feel free to leave your suggestion in the comments below!

Thursday, May 3, 2018

Bright Cheery Flowers Thank-You Card

I attended Scrapfest with some family and friends this April. (It was the freak ice-storm weekend. We only got to enjoy half of the event.) I had made little purse favours out of 12 x 6 thick, foiled, patterned cardstock. (I'll have to remember to post those sometime!)

As a thank-you for making the arrangements, driving, and gifting little handmade favours, I got this handmade thank-you card!


The layering of the die cuts is excellently done! The colour selection is bright, bold, and cheery! The cardstock matches the patterned paper perfectly!

I was very impressed and flattered to receive it. There's a nice computer typed message inside, matted with matching colours and decorated with some enamel dots. I love enamel dots. How flat they are is perfect for getting cards through the mail or even for putting on the insides of the cards as my friend did here.

Look how well composed this card is. Nice and full of visual interest! 

We got event goody bags too and, in there, we got an AlteNew layering stamp set. It looks suspiciously like this flower, so I wonder if my friend went and bought the matching die when we were at the event. I love die cuts because they have such perfectly clean edges but also give a small amount of tactile interest. My friend got a great deal on a Spellbinders Platinum 6 at the event and she's very pleased with it. You can see how pleased by the amount of die cuts on this card!

There were some other enclosures gifted in my card. I was surprised to get it! If anything, I should be thanking everyone else for letting me drag them off to events like Scrapfest!